Izumi

|
Bonjour!  Assalamualaikum Diary | DIY Tuto | FEELS Pardon my words Tagboard
❋ Laa ilaaha illallahu wahdahu laa syariikalahu, lahu’l-mulku wa lahu’l-hamdu wa huwa ‘alaa kulli syai’inqadiir’ ❋  FOllow   |
DIY paper Frame 
Assalamualaikum

As you can see the picture above, this lovely frames are made of paper. This lovely tutorial inspired by her.
First, you need a piece of paper, and measures the length of the picture that you want to put it in. cut the paper like this. I use 1cm to each line

Put the picture inside and fold the upside part but you can try fold them first if you unsure about the cut

fold the others part and put it inside the upside part

I use transparent sellotape to ensure the fold do not slip. so ta-daaa finished. /if you notices I use recycle 2014 kpop calender lol. save the earth
  Thankyou for reading //ㅅ// DIY Easy InstaxMini Frame 
Assalamualaikum fellas
 . Thanks to my sis because this idea is from her, so let's start-ue! . Thanks to my sis because this idea is from her, so let's start-ue!
 
Don't forget to try on your own! Goodluck
 Label: DIY, instax mini, Origami, polaroid, TUTORIAL Origami STINKO Bookmarks!
Assalamualaikum !
Running Man cipta satu evolution pakai snapback various style! Stinko, Miko, bercaption dll. Bookmars ni diinspirasi dari sini dan Stinko Cap.

so, let' start ;;

Barang yang diperlukan ;
Kertas warna merah, kuning, hitam dan putih
gunting
gam
penebuk lubang /tiada di dalam gambar/

Potong kertas hitam jadi segi empat sama sisi, dijah guna 8cm x 8cm
Lipat supaya jadi 3 segi
Lupat bucu kiri dan kanan ke tengah
Buka balik lipatan tu, lipat lapisan pertama segitiga ke bawah
Lipat balik bucu ke tengah dan masukkan ke dalam 'poket' tu

Potong kertas merah lagi kecil dari tadi, kecil yang boleh muat masuk dalam 'poket'
Gamkan kertas merah tu
Buat mata dari kertas kuning dan kening dari kertas putih
Gamkan kedua-duanya
Untuk pastikan bentuk mata betul-betul bulat, guna penebuk lubang, gamkan
Potong bentuk gigi dari kertas putih, kalau boleh, doublekan kertas putih supaya keras

jja jan~ Stinko bookmarks siap! Easy as pie guys!
Selain tu, korang boleh custome monsters sendiri!
Ini yang dijah dah buat. Gonna use themmm!
 
I put them like that and I think I should put some macro lol

GOOD LUCK !
Label: DIY, Origami, Running Man, TUTORIAL DIY Tote Bag "WOLF 88" Assalamualaikum! DIY time! Yayyyy! I love DIY much as I love food. so, haritu terfikir 'why don't you makes diy tote bag instead of buying it?' You can find plain tote bag at nodesignerhere. If you want to buy plain totebag, I recommend buy it here.
Official website - http://www.nodesignerhere.com/
Back to main topic, to makes diy totebag, you guys need a -
  Plain tote bag acrylic paint paint brush pencil & eraser glitter Plain tote bag acrylic paint paint brush pencil & eraser glitter
If you guys noticed that 'WOLF 88'. okayh, that design kecik. so, dijah besarkan kat kertas lukisan. And it will be like this

Korang boleh start tekap kat atas totebag tu

Done tekap, sekarang nk warnakan. To makes it more fabulus, I mix purple glitter with black fabric dye. It should be acrylic paint, but it hard to find acrylic paint in my city, terpaksa guna fabric dye -,-

start color the design ~

TADA~ this is the result ;__;

You can see the glitter that will run your life. Muahahaha! Girls, you guys should try this at home xD
#Tutorial DIY Birthday Card Assalamualaikum! DIY time! I'm totally love DIY ! Bulan lepas birthday bestfriend dijah, nak beli hadiah tak sempat, so dapat idea nak buat DIY birthday card. Pungah-pungah google, finally jumpa yang simple but awesome xD Here the example of my art work >< 
continue wif the tuto,
Bahan Asas -
 Kertas A4 keras Kertas A4 warna (pelbagai warna) Benang kait Kertas A4 keras Kertas A4 warna (pelbagai warna) Benang kait
Bahan lain -
Gam Gunting Pen hitam / biru
Cara-cara -
  Buat bentuk belon dekat kertas warna pastu gunting. Lekat benang kait kat belakang kertas belon tu Buat bentuk belon dekat kertas warna pastu gunting. Lekat benang kait kat belakang kertas belon tu 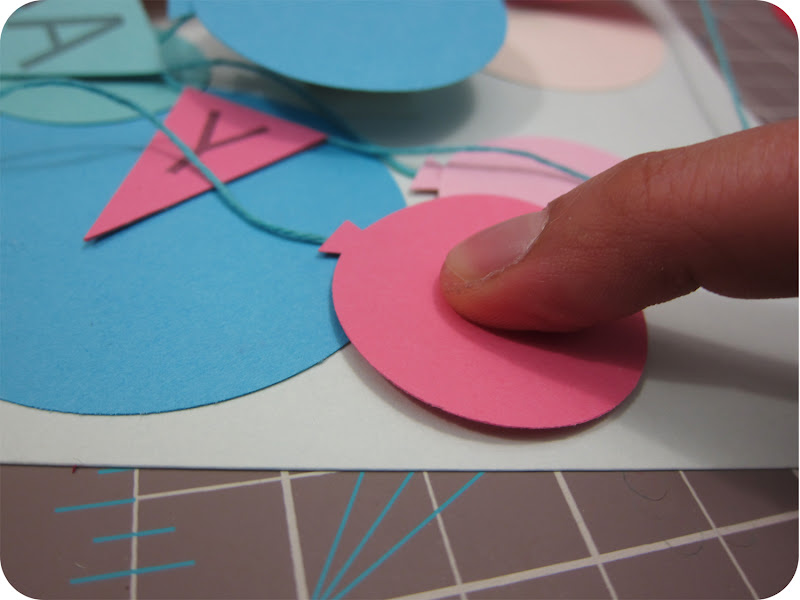 Lekat belon-belon tu kat dalam kertas A4 keras ikut kreativiti korang. Lekat belon-belon tu kat dalam kertas A4 keras ikut kreativiti korang. 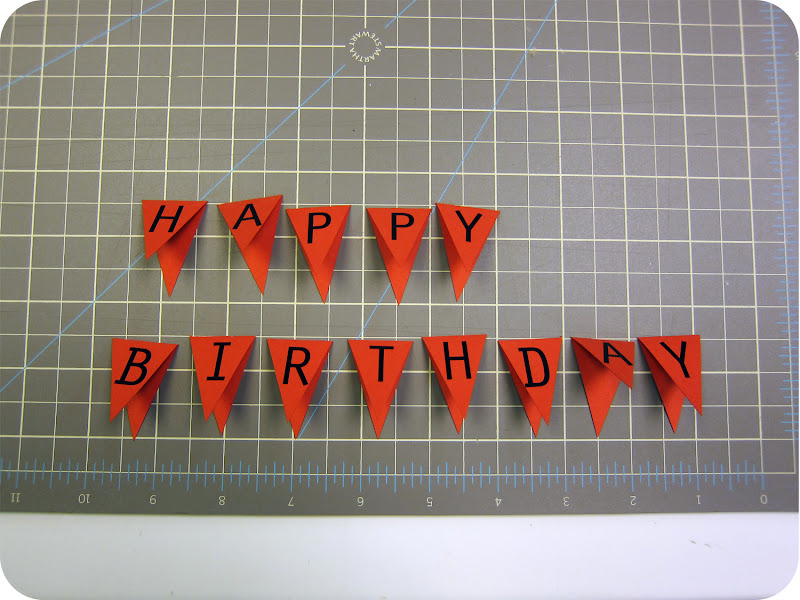 Buat perkataan 'HB' kat kertas lain macam dalam gambar. Buat perkataan 'HB' kat kertas lain macam dalam gambar. 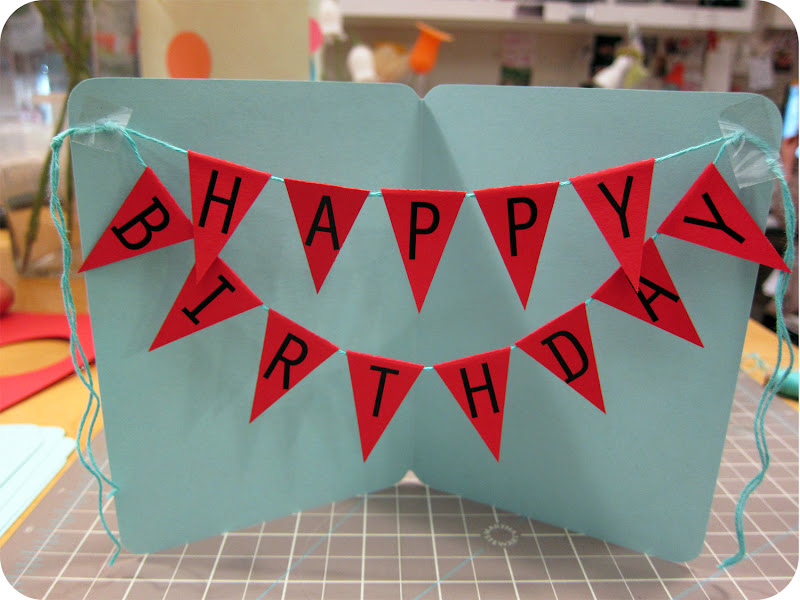 Lekat benang kait tu macm langsir, pastu gamkan perkataan 'HB' tu Lekat benang kait tu macm langsir, pastu gamkan perkataan 'HB' tuand, tada! siap ^^ bahagian cover depan korang boleh design ikut kreativiti korang. Memandangkan birthday bestfriend dijah tu yang ke 15 tahun, dijah mengutamakan '15' tu. Ni haaaa - 
Sampul kad ni pun korang boleh buat sendiri ^^ Goodluck ;D *tak paham boleh komen* HAHAHA
CREDIT - |


 Assalamualaikum | こんにちは | 안녕하세요
  Khadijah name given. Turn 16 years young this year. Proudly Malaysian. I love food much as I love DIY! Obsessed with kouhai. I love my parents and mah sistah. Still a students but full time work as fangirl. I'm kpoppers | Smiley | nakama.
 I stan YG most than SM | Cube | JYP because I love what their idols wear. Much swaggg. Haha I want to learn their fashion! Yehet Be ready kids :p I love their music too omg. But I stan SM idols much much too asdfghjkl omg too much idolssssss. FEELSSS x'D


